Protecting Your Investment Before You Ride
Taking a high-performance machine into the backcountry means subjecting it to deep mud, jagged rocks, water crossings, and extreme vibrations. If you own a premium electric off road bike, basic bicycle maintenance is no longer enough to keep you safe and operational. You are now managing high-voltage electronics, hydraulic fluids, and heavy-duty drivetrains that demand professional-level care.
For those who want to skip the deep dive and get right to turning wrenches in the garage, here is your TL;DR for ultimate wilderness rig maintenance:
-
Battery Longevity: Never store your battery fully charged. Keep it at 75% during idle days, and only top it off right before your ride to protect the lithium-ion cells.
-
Brake Safety: Regularly inspect your hydraulic fluid levels and ensure your electronic motor cutoff switches are engaging the moment you pull the brake levers.
-
Tire Survival: Utilize the factory built-in tire liners, and strictly adjust your pneumatic inner tubes' PSI based on the terrain.
-
Idiot-Proof Assembly: Always align the "arrow-to-arrow" waterproof connectors to prevent electrical shorts, and ensure thrust washers are installed correctly to prevent dangerous mechanical friction.
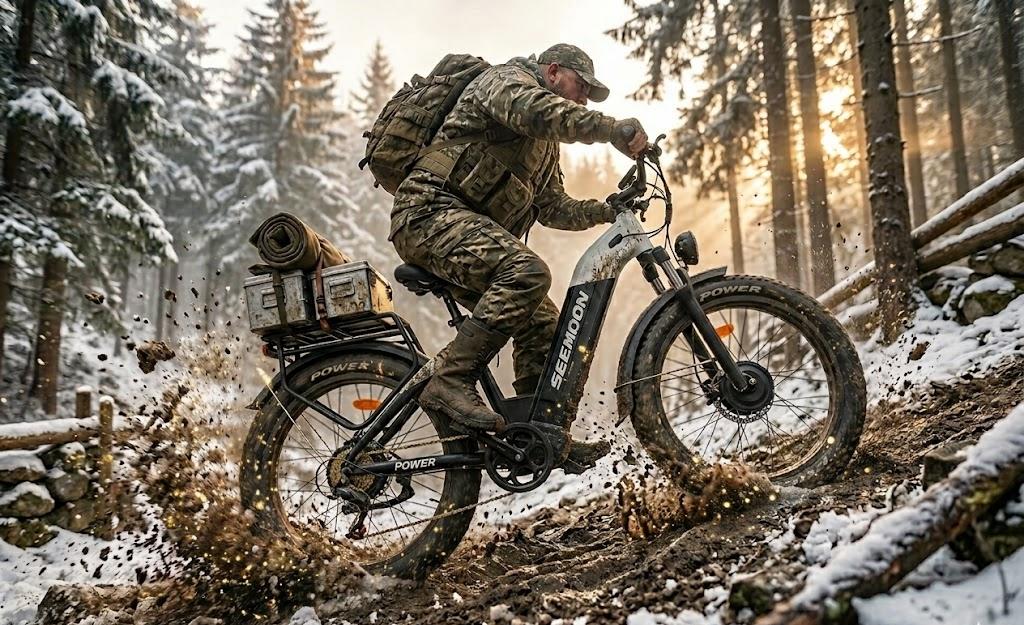
In our workshop, we have stress-tested countless all-terrain vehicles. Today, we are breaking down the hardcore maintenance, repair, and parts guide for your premium rig, using the highly engineered Seemoon SM1 as our mechanical benchmark.
Mastering 52V E-Bike Battery Health: BMS Balancing & Winter Storage Guide
The lifeblood of any serious all-terrain e-bike is its power plant. The SM1, for example, features an advanced 52V high-voltage system designed for aggressive trail riding. To maintain a stealthy aesthetic and armor the core components against trail debris, it utilizes a sleek aluminum frame with an integrated battery design.
However, hardware is only half the battle. Maximizing the lifespan and range of a 52V lithium-ion system requires a solid understanding of thermal management and the invisible software governing your power. Here is the technical breakdown of how to properly maintain your e-bike’s battery through optimal charging protocols and winter care.
⚡ At a Glance: Battery Care Best Practices
- Ideal Storage Capacity: ~75% (for long-term storage)
- Ideal Storage Temp: 50°F to 77°F (10°C - 25°C)
- Pre-Ride Charging: Charge to 100% only a few hours before riding.
- Balancing: Allow the charger to finish its full cycle uninterrupted, especially after deep depletion.
Understanding the BMS and the Charge Cycle
Unlike older generations of electric bikes, modern high-performance e-bike batteries rarely require you to manually open the pack—provided you let the Battery Management System (BMS) do its job. The SM1's battery is highly versatile: it can be charged directly inside the frame or detached and brought indoors. When you plug your battery into the wall for a full charge cycle, the internal BMS works to automatically balance the voltage across all the individual lithium-ion cells.
Expert Note: Manufacturers explicitly note that charge times may be extended when the bike is brand new, after prolonged storage, or following a deep discharge. This extended time is completely normal; it is the BMS performing a critical cellular balancing act. Never interrupt this process if the charger indicates it is still actively balancing.
The "Just-in-Time" 100% Charging Rule
To maximize the total lifecycles of your 52V power plant, follow this golden rule straight from e-bike engineering teams: charge the battery up to 100% just a few hours before you plan to ride. Leaving a lithium-ion battery plugged in and sitting at maximum capacity for days on end places unnecessary stress on the cellular chemistry. This practice causes "micro-cycling"—where the battery naturally drops a fraction of a percent, and the charger continually kicks back on to push it back to 100%. Over time, this constant high-voltage stress accelerates battery degradation.
Cold Weather Storage and Thermal Management
Winter can be brutal on high-voltage e-bike systems. If you want to maintain your maximum range potential year over year, strict temperature management is non-negotiable. Lithium-ion cells are notoriously sensitive to temperature extremes. Cold weather increases the internal resistance of the battery, which forces the system to work harder and temporarily slashes your effective range. Worse, storing your battery in a freezing winter shed or unheated garage can cause long-term, irreversible cellular degradation. Therefore, regarding this issue, PUJH recommends that after riding outdoors in cold weather, you should remove the battery from your e-bike and store it indoors in a relatively warm place to avoid the risk of battery performance degradation. The same applies in summer.
The Off-Season 75% Rule
If your e-bike is going to sit idle for more than a few days during the winter months, you must adapt your charging habits:
- Bring it Indoors: Remove the battery from the bike and store it inside your climate-controlled home. The officially recommended ambient temperature for charging and storage is between 50°F and 77°F.
- Aim for 75% Capacity: Never store your battery completely dead, and avoid storing it at 100%. Maintaining the battery level at approximately 75% significantly slows down internal chemical degradation compared to storing it at a full charge.
Treat your BMS with respect, manage your storage temperatures, and your rig will be primed to dominate the trails come spring.

Master Your E-Bike’s Stopping Power: Hydraulic Disc Brake Maintenance and Bleeding
When you are bombing down a rocky trail fully loaded with heavy gear, predictable stopping power isn't a luxury—it’s your only lifeline. Because e-bikes carry more mass and generate immense downhill momentum, the SM1 is spec’d with heavy-duty front and rear hydraulic disc braking systems to handle the load.
Why Hydraulic Trumps Mechanical
Unlike traditional mechanical brakes that rely on steel cables—which are prone to friction, stretching, and rusting—hydraulic systems utilize sealed fluid lines. When you squeeze the lever, non-compressible fluid transfers that force directly to the brake calipers. This translates to vastly superior modulation, heat dissipation, and linear stopping power with just a fraction of the finger effort.

The Enemy of Stopping Power: Air in the Lines
However, aggressive riding and extreme thermal cycles eventually take a toll. Over time, microscopic air bubbles and moisture can bypass the seals and enter the hydraulic lines. Because air is compressible, these bubbles absorb the hydraulic pressure. The result? Brake fade. Your levers will feel "spongy," mushy, and dangerously unresponsive.
The Pre-Ride Brake Checklist
Routine diagnostic checks are non-negotiable. Before you hit the trailhead, perform these quick tests:
- The Squeeze Test: Give both brake levers a firm, aggressive squeeze. They should feel rock-solid and engage the rotors smoothly well before the lever reaches the grip.
- The Bleed Protocol: If the lever pulls all the way to the handlebar, you need to perform a brake bleed. This maintenance procedure pushes the trapped air bubbles out of the system and replaces thermally degraded brake fluid. Because bleeding is a delicate, model-specific procedure, we highly recommend consulting industry experts. Park Tool’s official hydraulic brake bleeding tutorials offer comprehensive, step-by-step visual guides to doing this right.
Electronic Integration: Motor Cutoff Switches
On a high-performance e-bike like the SM1, your brakes do more than just clamp down on rotors—they act as a critical electronic safety override. The SM1 features built-in motor cutoff switches wired directly from the levers to the bike's controller. The exact millisecond you actuate the brake lever, a digital signal instantly cuts all power to the motors and disengages the cruise control, preventing the drivetrain from fighting your brakes.
How to test your cutoff switches:
- Securely lift the drive wheels off the ground.
- Apply a slight amount of throttle so the wheels spin.
- Lightly tap the brake levers.
- The motor power should cut out instantaneously. If the motor continues to spin, your sensor needs adjustment before your next ride.
Mastering the Terrain: The Ultimate SM1 Tire Pressure & Repair Guide
Nothing kills a backcountry adventure faster than a flat. When it comes to maintaining your SM1 Electric Adventure Bike, your tires and tubes aren't just accessories—they are the primary interface between your motor's power and the earth. The SM1 utilizes high-volume 26-inch anti-slip tires, engineered specifically for mechanical grip on unpredictable, unpaved surfaces. Because these are pneumatic systems (utilizing inner tubes), you have the tactical advantage of "tuning" your ride feel simply by adjusting your PSI (Pounds per Square Inch).
Tactical PSI: Adjusting for Environment
The "perfect" tire pressure doesn't exist; it evolves with the terrain. Here is how to optimize your SM1's footprint:
- Sand and Deep Snow (Low Pressure): When the ground gets soft, drop your PSI. Lowering the pressure allows the tire to deform, significantly increasing the contact patch. This creates "floatation," allowing the SM1 to glide over loose debris rather than digging a trench and stalling the motor.
- Hard-Packed Dirt & Pavement (High Pressure): On firm surfaces, higher PSI is your best friend. It minimizes rolling resistance, which directly translates to better battery efficiency and higher top speeds. More importantly, firm tires prevent "pinch flats" (or "snake bites"), where the tube is crushed between the rim and a sharp rock.
The First Line of Defense: Factory Tire Liners
The wilderness is a minefield of goathead thorns and jagged shale. To address this, the SEEMOON factory equips every SM1 with integrated, flat-preventative tire liners. This high-density physical shield sits between the outer tread and the inner tube, neutralizing most punctures before they ever reach the air chamber.
Field Recovery: The 15-Minute Repair
Even with liners, the seasoned rider stays prepared. Thanks to the SM1’s quick-release motor hub wiring, a field repair is straightforward and efficient. Always carry a "Trail Kit" consisting of a portable high-volume pump, reinforced tire levers, and a vulcanizing patch kit. By mastering these basics, you ensure that the only thing "wild" about your ride is the scenery—not your mechanical reliability.

The Workflow:
- Disconnect: Use the quick-release to decouple the motor.
- Drop the Wheel: Remove the wheel from the dropouts.
- Unseat the Bead: Use your levers to pull one side of the 26-inch rubber off the rim.
- Patch: Locate the leak, apply a vulcanizing solution, and press the patch firmly.
- Re-Install: Tuck the tube back in, reseat the tire, and inflate.
Mastering the SM1 Front-End: A Guide to Precision Fork Assembly and Electrical Integration
Whether you are unboxing your SM1 for the first time or performing a deep-clean rebuild after a grueling backcountry hunt, the integrity of your front-end assembly is non-negotiable. While the SM1 is engineered with several "error-proof" features, achieving peak performance requires a professional approach to torque, alignment, and component orientation. Follow this technical guide to ensure your rig is trail-ready and mechanically sound.
1. Front Fork Preparation and Shipping Safeguards
Before the wheel ever meets the dropouts, you must address the shipping hardware. The SM1 arrives with a protective spacer spring tensioned between the fork lowers to prevent compression damage during transit.
- Action: Remove and discard the shipping spring.
- Pro Tip: Inspect the fork seals immediately after removal for any signs of oil weeping that may have occurred during high-pressure transit.
2. Mounting the Chassis Components
The front fender and headlight assembly are mounted directly to the fork arch. This area is a high-vibration zone; neglecting proper fastening here leads to audible "fender slap" or, worse, a loose headlight during a night descent.
- Fasteners: Use stainless steel bolts.
- Vibration Mitigation: Apply a medium-strength threadlocker (Blue Loctite) to the bolt threads. This ensures that high-frequency trail chatter doesn't back the hardware out over time.
3. "Arrow-to-Arrow" Electrical Integration
The SM1 utilizes a modular wiring harness designed for "Plug-and-Play" reliability. To maintain the IP65 waterproof rating and prevent pin deformation, you must utilize the keyed alignment system.
- The Golden Rule: Align the molded arrows on both the male and female connectors before seating.
- Sealing: Once the arrows are aligned, push firmly until the connection "clicks" or seats fully. This engages the internal O-rings, protecting your motor controller and headlight from moisture ingress and short circuits.
4. The Critical Component: The Convex Thrust Washer
The most common mechanical error occurs during the installation of the high-torque front hub motor. The interface between the motor axle and the suspension fork relies on a specific thrust washer.
- Orientation is Everything: The washer features a non-flat, convex profile. It must be installed with the convex (curved) side facing downward (toward the motor hub).
- Why it Matters: This orientation creates the necessary clearance between the rotating motor housing and the stationary fork leg. Incorrect installation leads to catastrophic friction, heat buildup, and potential motor casing failure.
Warning: Reversing this washer will cause immediate mechanical drag and can score the internal surface of your fork lowers.
5. Cockpit Diagnostics and Safety Check
Before your maiden voyage, perform a "Static Tech Inspection" of the integrated switch block located on the left handlebar.
- Headlight/Taillight: Verify the beam pattern and rear illumination.
- Turn Signals: Ensure sequential timing is consistent.
- Horn: Confirm the decibel level is sufficient for trail communication.
Conclusion: Built to Survive, Maintained to Conquer
Maintaining a high-performance, 52V dual-motor machine like the Seemoon SM1 shouldn't be intimidating. By understanding the thermal management of your battery's BMS, respecting the mechanical tolerances of your thrust washers, and keeping your hydraulic lines properly bled, you transform from a casual rider into a self-reliant backcountry explorer. A well-maintained rig is the difference between an epic weekend in the wilderness and a long, grueling walk back to your truck.
Now that your heavy-duty machine is dialed in, fully charged, and ready for the dirt, it’s time to plan your next expedition. Not sure where your massive 330-lb payload capacity and twist throttle are legally allowed to roam? Head over to our comprehensive guide on the top US trails and laws for electric off road bikes to find the perfect testing ground for your freshly tuned machine. Or, if you need a refresher on the foundational technology that makes your AWD system so dominant, revisit our ultimate guide to off road ebikes.
Keep your tires properly inflated, your battery at 75% between rides, and we will see you on the trail. [Shop the Seemoon SM1 Today and conquer any terrain]
Expert FAQ: Troubleshooting Your Off-Road Rig
To wrap up this masterclass in garage maintenance, here are the most common questions we get from riders transitioning to heavy-duty, high-voltage machines.
Q1: How do I know if my dual motors need internal maintenance?
A1: The SM1 uses geared brushless type motors. Because they are brushless, they do not require carbon brush replacements. You only need to occasionally apply lithium-based grease to the internal bearings and gears. If you hear a grinding noise (unrelated to the brakes), it is time to open the hub and inspect the grease levels.
Q2: What should I do if my bike feels too heavy to push up a steep, unrideable hill?
A2: Utilize the vehicle's built-in software. By long-pressing the "-" button on the display, you can activate the Walk Boost Mode. The bike will automatically propel itself at a constant speed of 6km/h, saving you from physical exhaustion when pushing a heavy, loaded frame up a mountain.
Q3: If I run out of battery completely, can I still pedal a 330-lb capacity bike?
A3: Absolutely. While the frame has a massive maximum payload of 330 lbs, the bike itself is equipped with a Shimano 7-speed gear system. This mechanical drivetrain ensures that even with a dead battery, you can drop into the lowest gear and pedal your way back to camp.
Q4: Is there a way to secure the electronics if I park my bike outside a wilderness lodge?
A4: Yes. In addition to physically locking the bike, the advanced LCD display allows you to navigate into the personalized parameter settings to set a Password. This adds a crucial layer of software protection against theft.
Share:
How to Choose the Best Off Road Ebike: Dual Motor vs. Single Motor
Where to Ride: The Ultimate Guide to US Trails and Laws for Electric Off Road Bikes